Installing and Testing Kubernetes (k8s) Cluster on Ubuntu 20.04
Prerequisites:
-
Operating System: Ubuntu 20.04
-
Instance type: t2.medium (2vCPU and 4 GB RAM)
-
Storage: 20 GB
-
Number of Servers: 2 (one for the k8s master node and another for the worker node.You can create more than one worker node also but the minimum requirement for setting k8s is one Master and one Worker node).
Setup
1) I have created 2 EC2 instances with the above-defined prerequisites.

2) Open the following ports on the respective Master and Worker nodes (as we are using AWS servers, we will be adding these ports to the respective server’s Security Groups.
-
For Master Node: Control plane
Protocol |
Direction |
Port Range |
Purpose |
Used By |
TCP |
Inbound |
6443 |
Kubernetes API server |
All |
TCP |
Inbound |
2379-2380 |
etcd server client API |
kube-apiserver, etcd |
TCP |
Inbound |
10250 |
Kubelet API |
Self, Control plane |
TCP |
Inbound |
10259 |
kube-scheduler |
Self |
TCP |
Inbound |
10257 |
kube-controller-manager |
Self |
-
For Worker Nodes: Worker node(s)
Protocol |
Direction |
Port Range |
Purpose |
Used By |
TCP |
Inbound |
10250 |
Kubelet API |
Self, Control plane |
TCP |
Inbound |
30000-32767 |
NodePort Services† |
- |
Setting up the k8s Master/Control-Plane Node
1) SSH into the k8s_Master EC2 server (the EC2 instance that you want to treat as a k8s Master Node).
2) Change the existing hostname of the Ubuntu server to give it a useful and easily identifiable name.
ex:
sudo hostnamectl set-hostname <easily_identifiable_name>
For Master Node, I am giving the name “k8s-master”
sudo hostnamectl set-hostname k8s_master3) Use the bash command to view the hostname configured.
bash
4) Update the Ubuntu Server.
sudo apt update5) Install Kubernetes Helper packages.
sudo apt install apt-transport-https curl -y6) Install Containerd.
Containerd is a container runtime that manages the lifecycle of a container on a physical or virtual machine (a host). It is a daemon process that creates, starts, stops and destroys containers. It is also able to pull container images from container registries, mount storage, and enable networking for a container.
sudo mkdir -p /etc/apt/keyringscurl -fsSL https://download.docker.com/linux/ubuntu/gpg | sudo gpg --dearmor -o /etc/apt/keyrings/docker.gpgecho "deb [arch=$(dpkg --print-architecture) signed-by=/etc/apt/keyrings/docker.gpg] https://download.docker.com/linux/ubuntu $(lsb_release -cs) stable" | sudo tee /etc/apt/sources.list.d/docker.list > /dev/nullsudo apt updatesudo apt install containerd.io7) Create containerd configuration.
sudo mkdir -p /etc/containerdsudo containerd config default | sudo tee /etc/containerd/config.toml-
Edit the file
config.tomlat the location/etc/containerdand setSystemdCgroup = true.
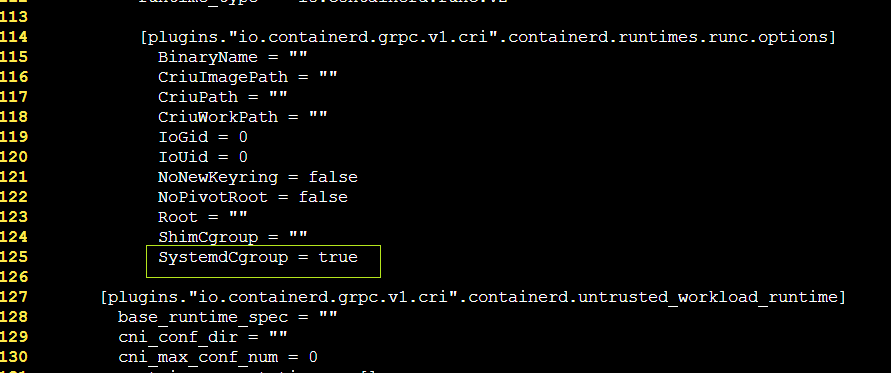
sudo sed -i 's/SystemdCgroup = false/SystemdCgroup = true/' /etc/containerd/config.toml-
Restart the container
sudo systemctl restart containerd8) Install Kubernetes and its related helper packages.
curl -s https://packages.cloud.google.com/apt/doc/apt-key.gpg | sudo apt-key addsudo apt-add-repository "deb http://apt.kubernetes.io/ kubernetes-xenial main"sudo apt install kubeadm kubelet kubectl kubernetes-cni -y9) Disable SWAP storage space.
sudo swapoff -a-
Check if there is any SWAP file configured at the path /etc/fstab. If there is a file configured for SWAP, remove it.
sudo cat /etc/fstab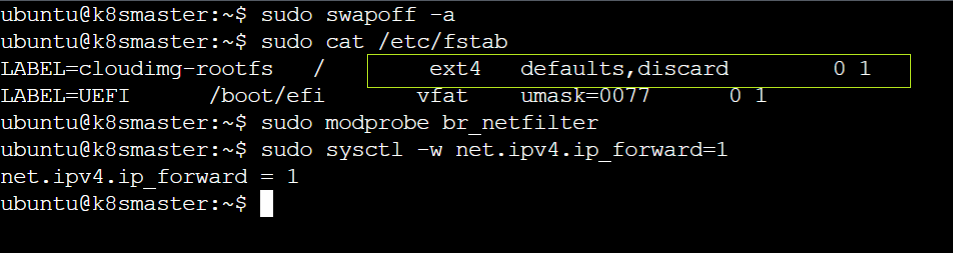
10) Bridge Traffic.
sudo modprobe br_netfiltersudo sysctl -w net.ipv4.ip_forward=111) Use kubeadm to prepare the k8s environment.
-
Kubeadm is a tool built to provide kubeadm init and kubeadm join as best-practice “fast paths” for creating Kubernetes clusters.
sudo kubeadm config images pull12) Use kubeinit with Flannel to initialize k8s configuration.
-
Flannel provides access to basic networking features and requires a limited amount of administration to set up and maintain.
sudo kubeadm init --pod-network-cidr=10.244.0.0/16| Copy the generated join key somewhere safe, as it will be needed to connect worker nodes. |
Here,
- kubeadm init is the command to initialize a Kubernetes cluster. This command is also used to bootstrap a new Kubernetes cluster and is typically the first step in setting up a new k8s master cluster.
- --pod-network-cidr=10.244.0.0/16 is a flag that sets the IP range for the pods in the cluster. The 10.244.0.0/16 CIDR notation is a common default value for the pod network CIDR in Kubernetes clusters.
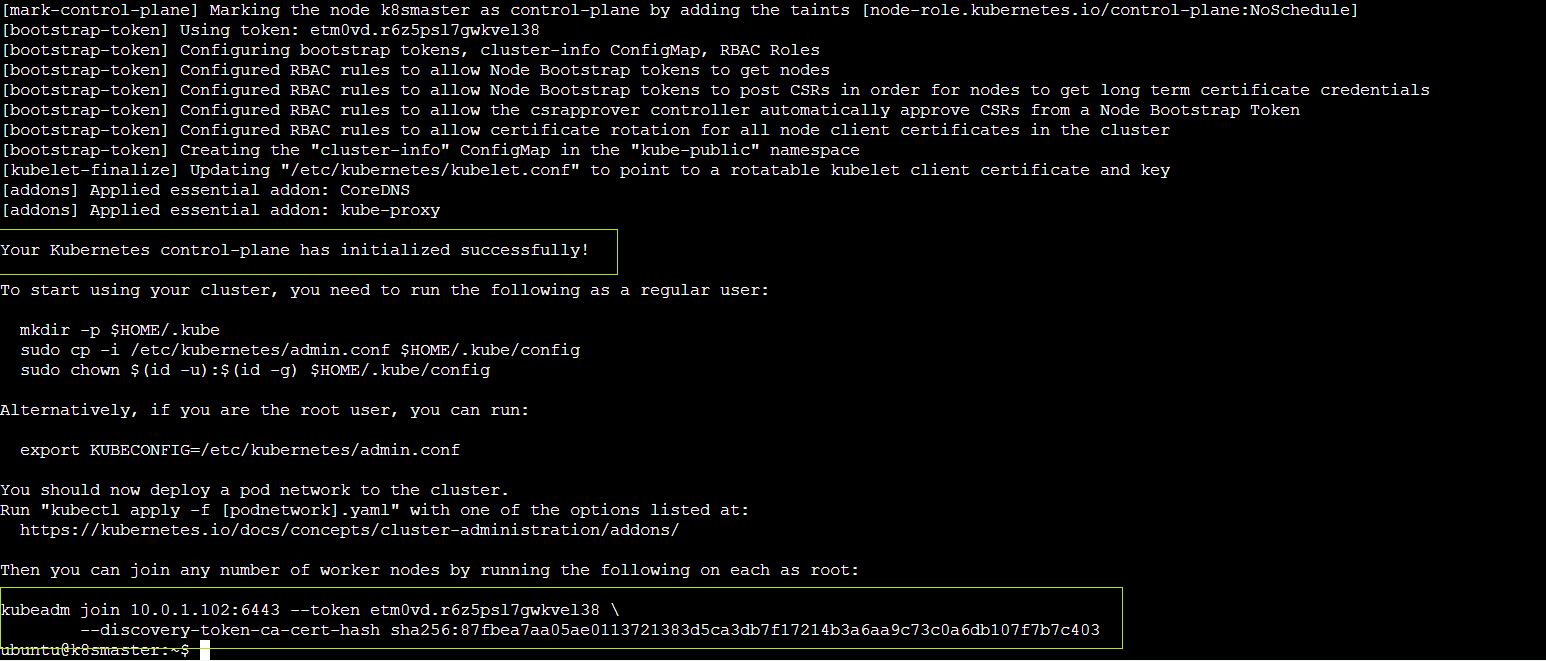
Once the command sudo kubeadm init — pod-network-cidr=10.244.0.0/16 is executed, you will see a message saying that you can join any number of worker nodes by running the following on each as root and has a key mentioned.
| In case you forgot to note down the generated Join key, you can always create a new one using the following command. |
kubeadm token create --print-join-command
13) Set up the local kubeconfig file.
mkdir -p $HOME/.kube
sudo cp -i /etc/kubernetes/admin.conf $HOME/.kube/config
sudo chown $(id -u):$(id -g) $HOME/.kube/config
14) Apply and activate the Flannel pod networking.
kubectl apply -f https://raw.githubusercontent.com/flannel-io/flannel/v0.20.2/Documentation/kube-flannel.ymlTest the k8s Master Node setup.
kubectl get nodes -o widekubectl get pods --all-namespacesOur k8s Master Node/Control-plane setup has been completed.
Setting up k8s Worker/Data-plane Node.
1) SSH into the k8s_Master EC2 server (the EC2 instance that you want to treat as a k8s Master Node).
2) Change the existing hostname of the Ubuntu server to give it a useful and easily identifiable name.
ex:
sudo hostnamectl set-hostname <easily_identifiable_name>
For Master Node, I am giving the name “k8sworker1”
sudo hostnamectl set-hostname k8sworker13) Use the bash command to view the hostname configured.
bash
4) Update the Ubuntu Server.
sudo apt update5) Install Kubernetes Helper packages.
sudo apt install apt-transport-https curl -y6) Install Containerd.
Containerd is a container runtime that manages the lifecycle of a container on a physical or virtual machine (a host). It is a daemon process that creates, starts, stops and destroys containers. It is also able to pull container images from container registries, mount storage, and enable networking for a container.
sudo mkdir -p /etc/apt/keyringscurl -fsSL https://download.docker.com/linux/ubuntu/gpg | sudo gpg --dearmor -o /etc/apt/keyrings/docker.gpgecho "deb [arch=$(dpkg --print-architecture) signed-by=/etc/apt/keyrings/docker.gpg] https://download.docker.com/linux/ubuntu $(lsb_release -cs) stable" | sudo tee /etc/apt/sources.list.d/docker.list > /dev/nullsudo apt updatesudo apt install containerd.io7) Create containerd configuration.
sudo mkdir -p /etc/containerdsudo containerd config default | sudo tee /etc/containerd/config.toml-
Edit the file
config.tomlat the location/etc/containerdand setSystemdCgroup = true.
sudo sed -i 's/SystemdCgroup = false/SystemdCgroup = true/' /etc/containerd/config.toml-
Restart the container
sudo systemctl restart containerd8) Install Kubernetes and its related helper packages.
curl -s https://packages.cloud.google.com/apt/doc/apt-key.gpg | sudo apt-key addsudo apt-add-repository "deb http://apt.kubernetes.io/ kubernetes-xenial main"sudo apt install kubeadm kubelet kubectl kubernetes-cni -y9) Disable SWAP storage space.
sudo swapoff -a-
Check if there is any SWAP file configured at the path /etc/fstab. If there is a file configured for SWAP, remove it.
sudo cat /etc/fstab10) Bridge Traffic.
sudo modprobe br_netfiltersudo sysctl -w net.ipv4.ip_forward=111) We will now need the use the Join token that was fetched while configuring kubeinit (in step number 12 of setting up the k8s master node) to connect the k8s worker node to the k8s master node.
Don’t forget to use sudo before the join token.
|
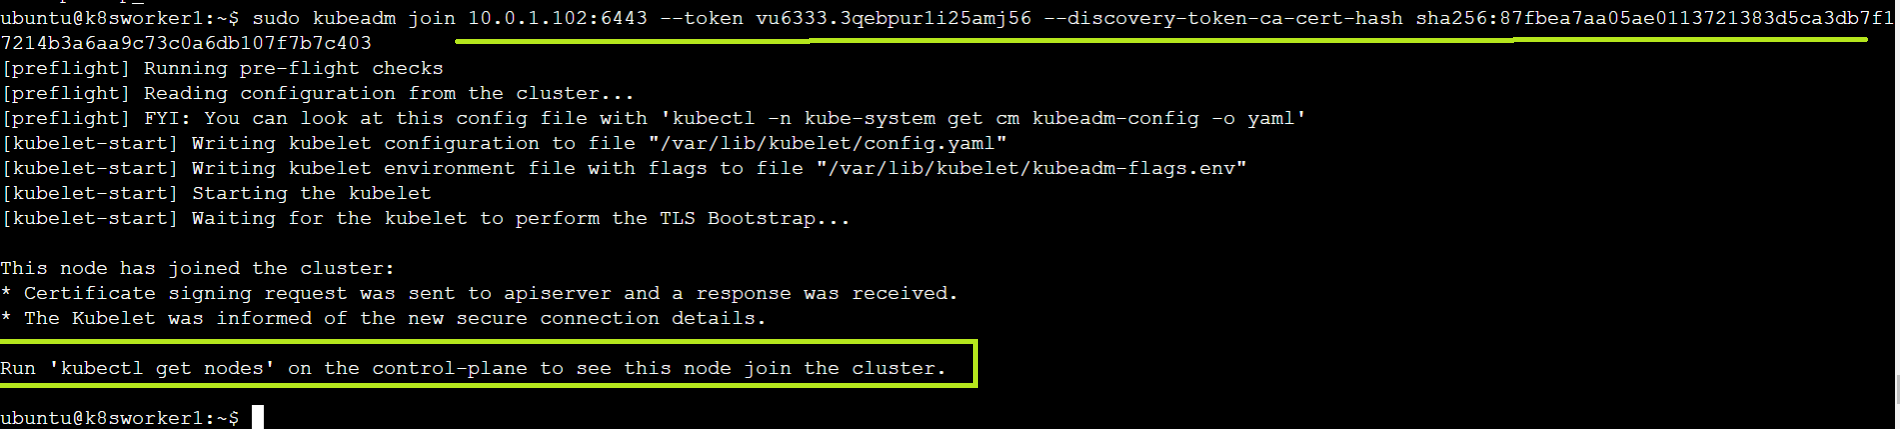
12) We have successfully connected our k8s worker1 node to our k8s master node.
-
We can create multiple k8s worker nodes and with similar steps, join them with the k8s master node and use them accordingly.
Test the k8s Worker Node setup.
-
Let’s test to know if our
k8s_worker1server really got joined with thek8s_mastercluster.-
Login/SSH into the k8s_matser server that we configured before.
-
We will hit the below-mentioned command to see the list of nodes available.
-
kubectl get nodes-
To get a detailed view of the available nodes, use the command:
kubectl get nodes -o wide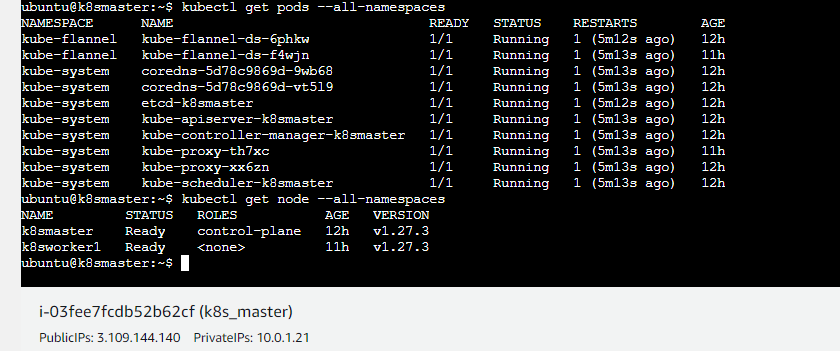
Our k8s Worker Node setup has been completed.